

Heads up! This post contains affiliate links which means I get may get a commission if you purchase something based on my recommendations here.
A while back I knitted the iconic Professor Meow sweater for myself and it’s honestly one of my favorite things I’ve ever knit. That’s why I’m completely baffled that it took over two years before the obvious next step occurred to me: I needed to knit a mini version of the pattern for my American Girl Doll!
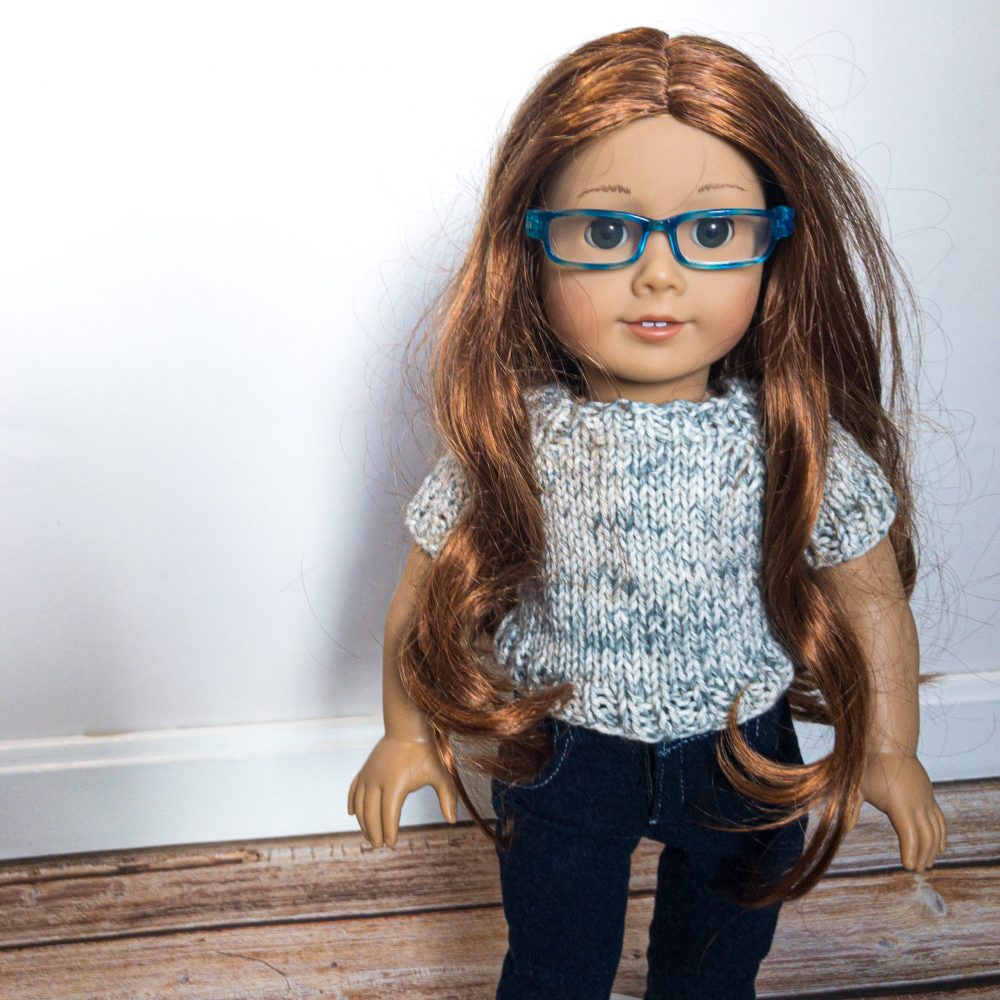
Resizing the pattern wasn’t too difficult. There was some math involved, but most of it was just knitting common sense and a little trial and error. I’ll walk you through the steps below, but first, how cute are we in our “Mommy & Me” sweaters??

How to Resize a Knitting Pattern for an 18’’ Doll
So, before you think I’m a magical knitting genius, I need to let you in on two secrets that made this an easy project:
First, although Professor Meow is an adult-sized sweater pattern, there is a children’s version called Mini Meow that goes all the way down to toddler sizes, so I already had a head start with having scaled-down pattern.
Second, the pattern is written for bulky yarn. This meant that instead of adjusting stitch counts to grade the pattern, I could resize it just by switching to fingering-weight yarn and smaller needles. There was still a little math involved, but nothing like having to grade the pattern.
Stop! If you like math and you want to know how to go about resizing a pattern to fit a doll, read on. If you just want to knit a doll-sized Professor Meow, you can skip the next two sections. My notes at the very end of the post list out the modifications I made to Mini Meow so you don’t need to figure it out on your own.

Do The Math, but Be Prepared for Trial and Error
I started by making a gauge swatch to determine how many stitches I had per inch. I knitted a few until I found one with a similar drape as the original sweater. The winning swatch used size 6 needles and I counted 18.5 stitches over 4 inches ( 4.625 stitches per inch). My doll has an 11-inch bust, but this sweater is meant to fit loose, so I decided to aim for a 13.5-inch bust. (No math was involved in picking that number. I just thought it sounded about right.)
To find the target stitch count, I calculated: 4.625 x 13.5 = 62.4. I need a pattern size that has around 62 stitches at the bust. (Luckily, the Mini Meow pattern has no shaping, so the stitch count for the bottom cast-on is the same as for the bust.)
The pattern is knit in two pieces that are sewn together. I’ll divide the target of 62 stitches in half but add 2 stitches to each side for seaming. This means I need to find a size that calls for casting on 35 stitches. There are two options: casting on 34 or 38 stitches — these are the two smallest sizes.
This is where trial and error come into play. After knitting a good portion of my sweater, I realized I wanted more positive ease (that 13.5’’ bust measurement I pulled out of thin air turned out to be wrong… imagine that!). I moved up to the next size, and it fit perfectly. Luckily, doll clothes knit up quickly, so you’re not going to waste a lot of yarn or time if you need to experiment.
For what it’s worth, this is a great resource for 18’’ doll measurements if you need them for your math homework.
Use Another Doll Sweater as a Reference for Length Measurements
While you can get a ballpark for your stitch counts using math, getting the proportions just right—especially for things like armholes and body length—requires some real-world benchmarks. I measured key areas like the sleeve length, armhole depth, and body width from another doll sweater I’ve knitted and used those as a guide while knitting this one.
Super Important Tip!! Plan Ahead for the Neckline
One key difference between dolls and humans? Dolls have disproportionately large heads and zero flexibility. That means you have to plan ahead for how your sweater is going to make it onto the doll. My usual trick is to incorporate a “notch” in the back. You can top it off with a button if the doll owner has nimble-enough fingers, or you can just leave it open and let dolly’s flowing hair hide it.

If you aren’t into modifying the pattern to add a back opening, you can always just make the neckline wider or finish with a super stretchy bind off… or do both!
I’ll be honest, I underestimated how much stretch I’d need for the neckline, and I didn’t make a notch or adjust my bind-off at all. When I couldn’t get it over my doll’s head I had to whip out some scissors to cut a small notch after the fact. I used the steeking technique where you crochet around the stitches you plan to snip to make a barrier so they don’t unravel. This worked fine for my purposes, but if the sweater is going to see a lot of playtime, this may not hold up so it shouldn’t be your “Plan A.”
Pay Attention to Fabric & Texture for a True Miniature
Since my goal was to create a “Mommy & Me” look, I wanted my doll-sized version to capture the feel of my original sweater as closely as possible. The full-sized Professor Meow uses Wonderfluff, a fluffy and airy yarn, so I mimicked the effect on a smaller scale by holding a strand of mohair with a fingering-weight wool. This added some extra expense to the project because I had to buy more yarn, but the extra detail was absolutely worth it because it made the final sweater look like a true miniature of the big one.

yarn details
Knit Picks Palette in Finnley Heather and Ash
Fingering Weight
100% Peruvian Highland Wool
50 g/231 yd ball
Knit Picks Aloft in Plover and Carbon
Lace Weight
72% Super Kid Mohair, 28% Silk
25f / 260 yard ball
project details
pattern: “Mini Meow” by Claire Slade (Knit Picks Exclusive Pattern – purchase here)
size knit: used the 21” chest pattern instructions
needles: US size 6 (4.0 mm) wood circular needles from my Sunstruck set
gauge: 18.5 stitches and 31 rows over 4” in stockinette
yarn used: including swatches and some wastage due to trial and error, I used: 102 yards of the main colors (Finnley Heather and Plover) and 46 yards of the contrasting colors (Ash and Carbon)
finished size: Width: 7.25’’ wide; Height to shoulder: 7.25’’ Height to middle of neckline: 5.5’’
duration: December 14-28, 2024
pattern modifications
Match my gauge of 18.5 stitches and 31 rows over 4” in stockinette and make the following modifications to the second size of the Mini Meow pattern (CO38)
- Sweater Back:
- Edging:
- 4 rows
- Body:
- Work 24 rows of stockinette above ribbed section
- Work the next 2 rows setting up for sleeves as written
- Work ten more rows of stockinette – if you would like modify things to insert a notch in the back, start the split on row 35 or 36.
- Begin the neckline on row 37 and follow the instructions for the second size for the remainder of the piece.
- Edging:
- Sweater Front:
- Edging:
- 4 rows
- Body:
- After the ribbing, work ten rows before starting the cat head chart
- You’ll work 14 rows of the chart (24 rows total so far above the ribbing section) then do your increase rows for the sleeves.
- Begin the neckline on Row 37 and follow instructions as written for the remainder of the piece.
- Edging:
- Sleeves:
- To set up, follow the instructions for the FIRST pattern size instead of the second.
- Work 3 rounds of ribbing.
- Neckline:
- Follow instructions as written. If you did not modify the back of the sweater to add a notch, you need to work this section VERY LOOSELY and hopefully it will fit over dolly’s head, unlike mine. 🤞
Love this!
Thank you!!