
The Best Knitting Supplies Recommended by an Expert Knitter
I’ve been knitting for a very long time and I’ve tried a lot of materials, patterns, gizmos, and gadgets. Here are some the best knitting supplies I’ve tried!
The Best Knitting Supplies Recommended by an Expert Knitter
I’ve been knitting for a very long time and I’ve tried a lot of materials, patterns, gizmos, and gadgets. Here are some of the best knitting supplies I’ve tried!
I don’t live near an LYS so I’ve gotten very good at shopping for knitting supplies online. I’m a big fan of Knit Picks, so I recommend their products a lot, but I’ll also throw in suggestions for products you can find at your Local Yarn Store, Etsy, Amazon, or your favorite big box craft store. Some of these are affiliate links, meaning I may get a commission if you buy something I recommend.
Knitting Needles and Needle Accessories
If you are only going to buy one thing on this list, buy this! My interchangeable needle set is one of the best knitting investments I have ever made. I use it all the time. I can’t imagine how many sets of circular needles I would have had to buy (and store!) in my lifetime of knitting without one of these. Also, you can knit everything on a circular needle – no need to work with, buy, or store straight needles anymore. I recommend investing in a set with flexible cables and smooth joins and try to get one where you can buy replacement parts because you will want doubles of some needle sizes. A good set will probably set you back about $50-80, depending on the brand you pick.
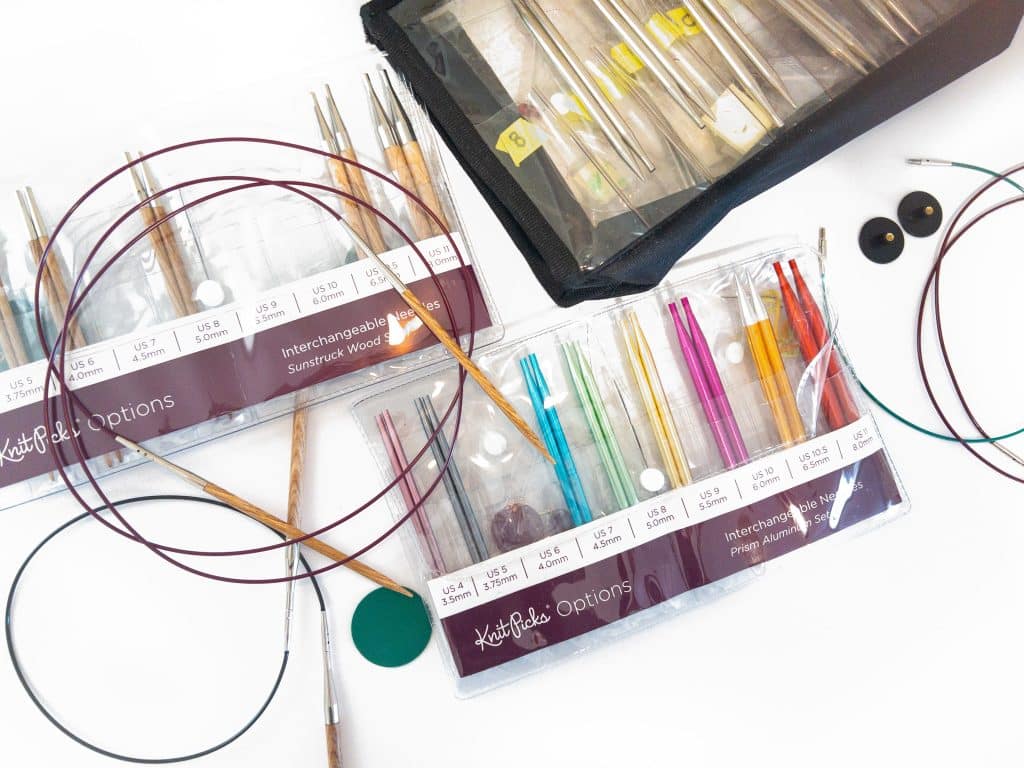
I currently use a variety of interchangeable needle sets from Knit Picks. I have the nickel-plated, aluminum, and wood sets. I have added some extra-long cables to my set to use for magic loop and have purchased doubles of some needle sizes I use often. I have three material choices to choose from so I always have the right needle to suit my project. (See my post on choosing wood vs. metal knitting needles.) I love the flexibility of the Knit Picks cables and the joins are super smooth and strong: I’ve never had one break on me and I use them a lot!
My first interchangeable set was the Boye Needlemaster which I bought back in 2004 and it lasted me about 10 years until I gifted it to another knitter and switched to my first Knit Picks set. I liked that the Boye set had needle options ranging from size 2 to 13, but I found it difficult to find the replacement parts and the cables were super stiff. At the end of the day, I wouldn’t recommend that set. There are lots of other companies that make interchangeable sets. A lot of knitters I know love the Knitters Pride set, which is comparable to Knit Picks in price. (I have the Knitter’s Pride Tunisian Crochet set and the joins are nice and smooth, but I’ve never tried the knitting needles). I’ve also heard good things about ChiaoGoo needles but they are very pricey!
Bonus tip! To make sure you tighten your needles well, you should get a needle gripper, stat! My original Boye set came with one, but it wore out after a decade and I recently replaced it with these.
Wood DPNs are perfect for knitting socks because they are light-weight and won’t pull at the joins as much as heavier metal DPNs will. For socks, I prefer the shorter 5” DPNs so I can comfortably divide the stitches up over four needles.
There are some downsides to wood DPNS, though. If you use them a lot, the tips may wear down so they are less pointy – if that bugs you, you’ll need to replace them every couple of years. This is more common with bamboo DPNs, like the Clover ones you’re most likely to find at the Big Box store. I like the kind that are made from laminated birch because they stay pointier longer.

The other thing to know about wood DPNs is that they can and will break if you are too rough with them (and it’s pretty startling when that happens – be warned!) The smaller the needle size, the more likely a break is going to be. When this happens, it’s not a flaw in the needle, it’s just the nature of working with a thin wooden stick. I always buy two packs so I have an extra on hand – especially if I plan to use them while traveling!
My top recommendation for wood DPNs are Knit Picks Rainbow, Caspian, or Sunstruck Double Pointed Needles. They are made from that magic laminated wood so they stay pointier longer and they are slightly more resistant to breakage. Also, Knit Picks puts six needles in a set so you have a spare if one breaks!
Pro Tip: spare wood DPNs make amazing cable needles – don’t waste your money buying cable needles. I own every shape and size of cable needle you can imagine and I still end up using a DPN. (Use a wood one, not metal – the wood is grippier).
If I am knitting socks with a needle size 1 or below or if I’m doing cables, I typically avoid using wood DPNs, they feel a little flimsy to me at such small sizes. Instead, I will do magic loop on metal circular needles which are super pointy and strong. My interchangeable needle sets all start at US size 4 needles, so I have a nice collection of fixed circular needles in the smaller sizes.

I’ve always been super happy Knit Picks circular needles, particularly the small diameter ones for my magic loop sock projects. The 24” cable is really the best, but most of my collection are 32” or 40” cables because I occasionally like to use them for magic loop on doll clothes too. You’ll see me using the nickel-plated tips across this blog, but they have replaced those with a new line of steel-tipped needles. I’ll update this page as soon as I’ve had a chance to try them!
Knit Picks also sells fixed circular needles in their wood lines Caspian, Radiant, and Sunstruck. I prefer Sunstruck – the light-colored ones. The Caspian and Radiant sets are beautiful but if you’re using small-diameter needles (like on socks), it’s hard to see dark fingering weight yarn on the tiny dark needles, so the lighter tips are a little more practical. I love wooden knitting needles instead of metal ones for anything where your gauge is going to be a little loose, like lace shawls or open-work sweaters. The wood is a little grippier so it’s easier to maintain even tension. (I have a whole blog post explaining the difference between wood and metal needles here).
The Knit Picks fixed circular needles have a flexible cable, a very smooth join, and they’ll only set you back about $10 (less if you catch them on sale, which happens a lot). They are high-quality and a great option if you are building a needle collection on a budget.
If you are shopping at your LYS or elsewhere on the interwebs, my top circular needle recommendation is ChiaoGoo Red Lace (find on Amazon or Etsy). They are super pointy and I love the wire-like cable. Some knitters also swear by Addi Turbos, but TBH, I don’t love the stiffer cable on Addi needles. Both ChiaoGoo and Addi will set you back $16-$20 a pop. That makes them “sometimes brands” in my book.
The thing to remember about fixed circular needles is that there are a lot of combinations of needle size and cable size and you will end up with a bunch in your collection if you rely heavily on them. I urge you to invest early in interchangeable needles for at least the “middle sizes” and only buy fixed circulars as needed for the sizes outside your interchangeable set. (The goal is to spend less money on needles and more money on yarn!)
True story: needle sizes and needle sizers can vary ever so slightly between manufacturers. This isn’t a huge deal, but it can be a problem when you have a mystery needle and you are trying to use a needle gauge to identify the size. (Which can happen if you own hundreds of DPNs like I do…)
If this is something that keeps you up at night, buy a needle gauge from the same manufacturer that makes your needles. Then again, if you like to roll the dice with your life, or if you just want some fun Instagram props, there are some seriously cute needle gauges out there on Etsy or at your LYS – like this sheep needle sizer!
You can also get multi-purpose needle sizers that include handy windows for measuring your gauge or ones with built in notches for measuring the WPI (wraps per inch) of your yarn. (Here is one that does it all!)
The primary purpose of these devices is to prevent your stitches from sliding off your needles when not in use. But they are also quite useful to cushion the pointy tips of your knitting needles so you don’t impale your hand on them when you reach into your project bag. (Ask me how I know about this type of injury… ouch!!)

You can find two kinds of DPN keepers:
- The most popular are like little envelopes with snaps. These are cool because they can also be used with circulars when you are knitting with magic loop. You’ll find a zillion of these on etsy – here is a seller who sells them in lots of different fabrics.
- Less popular, but a fave of mine, are the kind that are a piece of elastic with two fabric pockets at the end. I made one and it wasn’t too hard, or you can buy them on etsy.
I have found that the best way to organize my knitting needle collection is by keeping them in those clear zip-up pocket inserts that are meant to hold your pencils in a binder or day planner. You definitely want the clear ones so you can see what’s inside at a glance – you can get a 12-pack on Amazon for $5-$10 or you might be able to find them slightly cheaper at a dollar store.
I keep all my sock-size double point needles and circular needles in a small A5 binder, with a labeled pocket for each needle size. I like that my binder is made out flexible vinyl so I can pack it full of pages and let it bulge a little.

When you set up your binder, be sure to alternate the direction of zipper pages as I’ve done in the photo above. You don’t want all the white zipper pulls to all stack on top of each other or else it will make one corner of your binder super thick and you won’t be able to fit as many pages in.
As you can see, I typically keep my needles in the original packaging within the binder pockets because I have several needles in each size and I don’t want to mix them all up – especially the DPN sets.
I keep my larger diameter DPNs and circular needles stored the same way, but in larger half-letter size pocket pages. I couldn’t find a flexible binder in that size so I just keep those bound together with loose binder clips.
Before I invested in the binder pockets, I used to keep my needles in quart-size ziplock freezer bags held together with a big binder clip. This wasn’t a terrible system, but I vastly prefer the binder pockets.
I don’t recommend investing in straight knitting needles unless you have used them before and you know you love them. (Some knitters do – and that’s okay!!) You’re going to get a lot more mileage out of circular needles and they can do almost anything a straight needle can.
Nevertheless, I have a large collection of straight needles that I bought when I was first learning to knit or that have been passed down to me over the years. Straights can be a pain to store – especially the long ones! Your best bet for these is a needle roll.

I made this awesome needle roll ages ago using instructions in the original Stitch ‘N Bitch book by Debbie Stoller. I made mine out of corduroy and I love how sturdy it is, but you could also get the same effect with cotton if you add iron-on interfacing.
If you are making or buying a needle roll, be sure to select a pattern with a flap that closes over the needles so they don’t fall out! This is super important. I’m always flabbergasted when I see these made without a flap… I think: “the person who made that was definitely not a knitter!”
Speaking of people who are not knitters… if you have a friend who quilts or sews, they very likely have tons of fat quarters or other small bits of fabric in their stash they could gift you for this project and/or and they could make one of these very easily and might consider a trade of a sewn item for a knitted item! (If you are lucky enough to find yourself with a friend like this, they might be down for making you some DPN holders too!)
Knitting Notions
The sock ruler is going to change your life. Get one, stat! They come in a few sizes, so if you want to get more than one… go for it! This tool is perfect for when you are knitting the foot of a sock, which is hard to measure with a tape or regular ruler – the rounded tip of a sock ruler is key!

I’ve written a post about how to use a sock ruler if you want to check that out.
Every knitter should own several of these clicking row counters. Be sure to buy the round green one with the white lock on it so it doesn’t advance rows if the clicker gets pushed in your bag. There is another popular clicker row counter that looks like a red rectangle – these don’t have the locking mechanism – use them at your own risk.

There are also cylinder-shape red row counters without a clicker. These are okay and very cheap so you can buy a bunch, which is handy, but you have to twist them to advance the row count which usually requires two hands, so it can interrupt your knitting rhythm. The green kind are definitely my top pick!
I was reluctant to buy one of these magnetic chart keepers, since I was always happy with using a post it or a highlighter tape to follow charts, but I have to admit – this has become one of my favorite tools! It’s much faster to slide the magnet as you work rows moving a sticky marker.

When I’m done knitting, I mark my final spot with highlighter tape – I don’t trust those magnets to stay put when tossing this into my knitting bag. #KnittingParanoia

Speaking of Highligher tape… this stuff is awesome for marking your spot on charts or anywhere on a written pattern. Highlighter tape is way better than a post it because it’s as wide as you like and it stays sticky for a long time. (To give you a sense of how long one piece of tape lasts, I’ll tell you that I bought a single roll of highlighter tape about 10 years ago and I’m still using it).
My top pick for a tool to measure your gauge in knitting is the EZ PZ Gauge Ruler and a smart phone! I discovered this combination by accident and I’m so glad I did! Measuring gauge is so easy now! All you do is lay your swatch on a flat surface, set the EZ PZ Gauge Ruler on it and snap a picture with your phone. Then you can zoom in on your screen to count the stitches. If you’re having trouble seeing them, you can play with the contrast or lighting settings in an image editor. I also like to use my image markup tool to check off each stitch or row as I go to avoid double-counting.

If that process sounds too involved, you might like my second gauge measurement tool: a printed one-inch gauge ruler, like this one by Ann Budd. All you do is line up the little v-shapes on this clear ruler with the stitches on your swatch until it matches one of the gauges. There are white and black markings on the ruler so you can use with dark or light yarn. Using this tool is one of those “do as I say, not as I do” sort of things. Really, you shouldn’t measure gauge over just one inch – we all know better – but I use this thing all the time and the world hasn’t ended yet. So, you know, use at your own risk. 😉
If you are looking for cheap snag-free stitch markers, I highly recommend buying circle connectors or closed jump rings from the jewelry supply store or from the virtual aisles of Amazon or Etsy. (You want the solid kind, not standard jump rings or split-rings, which can snag your yarn. They are also called linking rings, spacers, or closed jump rings).

For sock knitting I use 6mm circles and you can usually snag a 50 pack for a few bucks. You can also find cute connectors like hearts, stars, and even cats! Just search Etsy for Circle Connectors and you’ll find a ton of options. I lose stitch markers left and right and I’ve saved so much money since I started buying these from the jewelry supply aisle instead of the knitting aisle.
Yes, and… you also want tons of cute stitch markers! I know! Trust me, as the years pass you will collect so many cute ones through impulse buys, DIY efforts, or gifts from friends. Don’t worry – they are coming your way! Also keep your eyes out for cute little tins and boxes to store your markers in.
Get yourself a pair of Kids’ Scissors to keep in your notions bag – you want to avoid anything with pointy tips so you don’t accidentally stab yourself when fishing for a notion. (Ask me how I know…) They are cheap and usually come in multi-packs, so buy a bunch and put one in each of your notion kits.

Kid’s scissors are also TSA-friendly if you like to knit on the plane. (Ironically, those round yarn cutters that look like a pendant and don’t have any blade exposed are not okay to fly with – mine was confiscated – go figure…)
For safety reasons, I avoid pointy scissors in general, but you will eventually need a sharp pair of scissors if you want to steek or insert a sock surgeon’s afterthought heel – one of my favorite knitting technique. I love these steeking scissors because they have a protective cover so I can keep them in my knitting bag. (But remember to take them out of your bag before heading to the airport – you can’t fly with these).

If you’re in a pinch, you can also grab a pair of those small gold embroidery scissors that you can find in any craft store, but I like these better and they are cheaper.
Darning Eggs comes in handy a lot! I think I’ve only used it for darning once… I use it the most when I’m weaving in ends because it gives you a nice firm surface to work on. It’s especially helpful if you are trying to close up any gaps at a sock or thumb gusset.

There are a ton of darning eggs or mushrooms on etsy in a lot of different price ranges. Many are vintage/antique but there are some new ones as well. Mine is an egg-style and that I bought at a farm stand on a road trip though Pennsylvania, similar to this one from Knit Picks.
BTW, when I first started knitting I heard someone suggest that you can use a lightbulb as a darning egg… I really wouldn’t recommend that! 😬 Sounds like a bad story from my 1L Torts class!
There are some hella cute knitting bags out there and I love to collect them! I leave my knitting out in the living room a lot, so they look nice in the cute cotton bags. (BTW: I adore EweGotaBag on Etsy!!) However, if I’m storing a project that I’d like to set aside for a while or if I have an unusually large number of works in progress (WIPs) going on, I like to use clear project bags so I can see what is inside at a glance. I also use small clear bags to hold my notions, again, so I can tell immediately what’s inside and where.

I collect the clear-zippered bags that often come with sheets or blankets for large projects, like the one on the left, and I got the small one in the front as a free gift with some makeup. You can also buy the small ones at the drug store. The one on the far right is from Knit Picks and they come in lots of sizes. Those ones are made with really thick vinyl and I love them. (The kind that come with your sheets aren’t quite as high quality, but – hey – they are free!). I avoid using ziplock bags for storing projects because the needles poke right though them, but they will do in a pinch.
Curved tapestry needles are life when it comes to attaching limbs on amigurumi! They are also handy for weaving in ends on lots of projects with worsted weight yarn. Get one with a sharp point so you can split the yarn every now and then when weaving in ends – it helps keep it in place.
For weaving in ends on my socks I use an embroidery needle. Really, I’ll use these needles anytime I can thread the yarn through the eye – they are my favorite! I like the long 2.5” needles with a pointy tip so I can split the yarn ends if needed, but when usually when I weave in ends or do Kitchener stitch with an embroidery needle, I use the eye-end, not the pointy end.

This is one of those times where you can’t beat an in-person shopping trip to Jo-Ann so you can get a good look at the length and eye-size of the needles. If you have good eyes and are experienced at threading needles, you don’t need the large-eye kind. If you must shop online, look for a multi-pack with lots of sizes to try out. (Like this set of ribbon embroidery needles on Amazon).
To store your needles in you notions bag, you can use a tube for storing seed beads or you can try your hand at embroidery and DIY a cute little needle book out of felt. (Check out these kits with all the pieces pre-cut!) The tube takes up less space, but storing them in a book makes is easier to find the needle you are looking for. Take your pick.
If you like to take your knitting along wherever you go, it can be a pain to carry a full notions kit, that’s why I put together this “knitting emergency kit” that I keep in my grab-and-go project bag. (Usually a pair of vanilla socks).

The mini crochet hook keychain is great for picking up dropped stitches or you can use one of the locking stitch markers to secure the loop until you can fix it later. If you do nothing else, at least put some locking stitch markers in your wallet for knitting emergencies!!
The scissors may seem like overkill, but I always seem to run across a factory knot when I’m out and about, so I love having the collapsible scissors just in case. Plus, people need scissors all the time and you’ll impress everyone when you have some in your bag. I’ve heard that these scissors are okay with TSA, but I’ve never tested my luck at the airport. However, the security team at the courthouse confiscated them the last time I went in for jury duty and they seemed pretty upset with me for trying to bring a “concealed blade” to court. So, watch where you carry these things, I guess.
Yarn Storage and Management
My swift and ball winder are among the best investments I’ve made in my knitting journey, but not every knitter needs them. If you primarily buy yarn at your local yarn store (LYS), they will often cake it up your skeins for free so you don’t have to do it at home. On the flip side, if you primarily buy yarn at your big box store, it’s almost always made up in balls or donuts, so no winding is needed.
If, like me, you buy your yarn online and you favor brands that sell yarn made up in skeins, you should invest in a winding setup as soon as you can. (Unless you enjoy winding yarn balls by hand. If so: more power to you!)

Yarn Swifts
Swifts come in many shapes and sizes. I like an umbrella swift because it’s easy to store, but you’ll want to keep it in the box it comes in, or get a case for it so it doesn’t get caught on stuff. (A yoga mat bag works great!)
I have the basic table-clamping Birch umbrella swift from Knit Picks. When I first bought it, I was disappointed because it’s tied together with string and I thought that made it cheap, but trust me: it’s very sturdy. That’s just how these swifts are made. I’ve had mine for about 15 years with no issues.
Ball Winders
You’ll also want a winder to go with your swift. I have a basic hand crank ball winder that clamps to a table and it’s great. (Also 15 years old). Knit Picks released a new professional model that looks really nice, but it’s too much of a splurge for me since my existing winder is perfectly serviceable. But if you’re buying one for the first time, consider this one because it would make winding more enjoyable! It’s bigger, has two yarn guides, and you can turn the crank in either direction.
Speaking of a splurge… they also make electric winders and you can also get a cool device attached that measures your yardage as you wind. They’re pretty cool, but definitely overkill for most knitters (expect it to set you back about $500, unless you can find a used one). You can buy cheap electronic winders from retailers like Amazon or Temu, but I’d proceed with caution: I’ve heard horror stories about them going rogue and tangling up your yarn all over the device, ruining both your yarn and the winder.
It’s nice to have your yarn out on display so that you can admire its beauty… but you who else can admire it? Bugs! If you have a small stash and you can afford to roll the dice, go for it, but if you are a serial yarn collector like me, you need to protect your investment!
I used to store my yarn in baskets and cloth bins, and a few years ago, I had a horrible infestation and lost about 3/4 of my stash. Now, each yarn goes in its own ziplock bag, and those bags are stored in plastic storage bins. The plastic bins are more effective at keeping out bugs, and keeping yarns in separate bags reduces the risk of cross-contamination if a stowaway manages to get in.

I buy ziplocks in bulk on Amazon – I like the kind with the zipper top. I usually get the actual Ziplock brand bags because I use them in the kitchen too, but these generic ones come in bigger sizes if you need that. I imagine the 2.5 gallon ones would be nice if you are storing a bunch of skeins for a sweater or something.
BTW, I don’t go to all the effort to organize my bin by yarn weight or color or anything like that. I fully rely on the stash feature of Ravelry to browse my collection, and I use their “stored in” field to track what bin it’s in so I can find it when I’m ready retrieve the yarn for a project. (The bins are very cleverly labeled A, B, C, D, and E.)
As I mentioned above, I take great care in storing my yarn in plastic bags and bins to protect it from insects. However, it’s not practical for me to store my knitted items in plastic as well. Instead, I place cedar blocks in my sock drawer and other places where I keep my knits. This has proven to be quite effective in keeping insects away. Every summer when I’m done wearing wool for the season, I take out some fine sandpaper and buff the blocks a bit to refresh the scent and keep the bugs at bay!
I got the blocks below at Knit Picks, but this brand isn’t in stock anymore. They have other options though, including beautiful cedar boxes. There are also zillions of cedar options on Amazon. I’m a huge fan of these cedar flowers!

I like to know exactly how much yarn I use in my knitting projects and how much yarn I have in partial skeins leftover in my stash, so my yarn scale gets a lot of use!
Any scale that measures down to the gram is perfect. I bought this digital pocket scale because it was cheap and it came with a little 50g weight that you can pop on the scale any time to ensure it’s working correctly… it always turns out that it is perfectly accurate, but I get paranoid about these things, so I like to be able to check from time to time.

So, if I use a 100g/437 yard skein to knit a pair of socks, I divide 437 by 100 and determine there are 4.37 yards per gram of this yarn. If I use 71 grams to make a pair of socks, I multiply 71 by 4.37 and discover that I used 310.27 yards in the project.

Note: If you need to know exactly how much yarn you use in a project, you’ll want to weigh the ball of yarn before and after you make the project. You’ll still use the information to from the label to calculate how many yards per gram, but it’s common for the actual weight of the yarn you purchased to be off by a gram or two from the listed weight on the label (so, your 100g skein of yarn may actually be 98g, for example).
Blocking Supplies
Most knitted items need to be blocked and I highly recommend using interchangeable blocking mats for this task. These foam mats fit together like puzzle pieces so you always nice flat surface that you can customize to the size of your knitting and your pins are nice and secure in the foam. Before these came out, I used to use a huge folding board that was a pain to store and wasn’t big enough for blankets, so these are a real treat! These days, most brands of mats come with a grid printed on them to help block your piece to the right measurements. Mine are pretty old so they are just plain, but I get along just fine.

Knit Picks sells two kinds of mats – plain and printed – that come in 9-packs of 12” square mats. If you don’t need the grid, the plain set is quite a bargain! If you’re an Amazon fan, they have tons of options to choose from, but many brands sell them in packs of four, which only gives you a 24×24” blocking surface, so be sure to read the product description and buy enough mats to suit your needs. (In my experience, you’ll need at least 16 mats to block a baby blanket.)
I own several sets of sock blockers made out of various materials, and I’ll confess: all the pretty ones are mostly just Instagram props (go look!). When I block socks, I use those basic blue plastic sock blockers, which work like a charm! (I have written a whole blog post about what kinds of socks need blocking and which are best left alone, so go check that out).

First, we’ll start with the cute ones! My current favorite wooden sock blocker maker is MlynJedrow on Etsy. She made the flower blockers in the photo above. I love that she will make the blockers with or without a hook at the top. I prefer the aesthetic of the no-hook look and those can be hard to source. Second, her wood cutting is very well done – everything is super smooth and will not snag your socks. And third, you can order these in multiple sizes and you can even personalize them with your name. pretty cool!
Second, we’ll look at the practical sock blockers. My favorite are the blue plastic ones; I own them in small, medium, and large sizes. (If you only want to invest in one pair, there is a hack in the post I linked above where I rigged up an extender to attach to the smaller-sized blocker). I bought mine at Knit Picks during various sales as add-ons to get to the free shipping threshold. You can also purchase similar ones made by Knitter’s Pride on Amazon.
I don’t love the wire-style blocker on the right side of my photo, but these may come in handy if you have wide calves because they are a bit wider than the plastic ones, and they are pretty flexible so you can adjust the width a bit as needed. If that appeals to you, you can get them on Amazon. This set of three sizes is a pretty good bargain.
I’ll also throw in that there are adjustable sock blockers available. I have never needed to buy a set because I already own a ton of sizes, but I am curious about them. Knit Picks carries wood ones that are made by Katrinkles, so I bet they are high quality. (I’m a big fan of their stuff!) There are a lot of options on Amazon – both wood and plastic – most have mixed reviews, but they are pretty affordable if you want to try rolling the dice. If you have tried them out, I’d love to hear about it: DM me on Instagram or Ravelry!