
Heads up! This post contains affiliate links which means I get may get a commission if you purchase something based on my recommendations here.
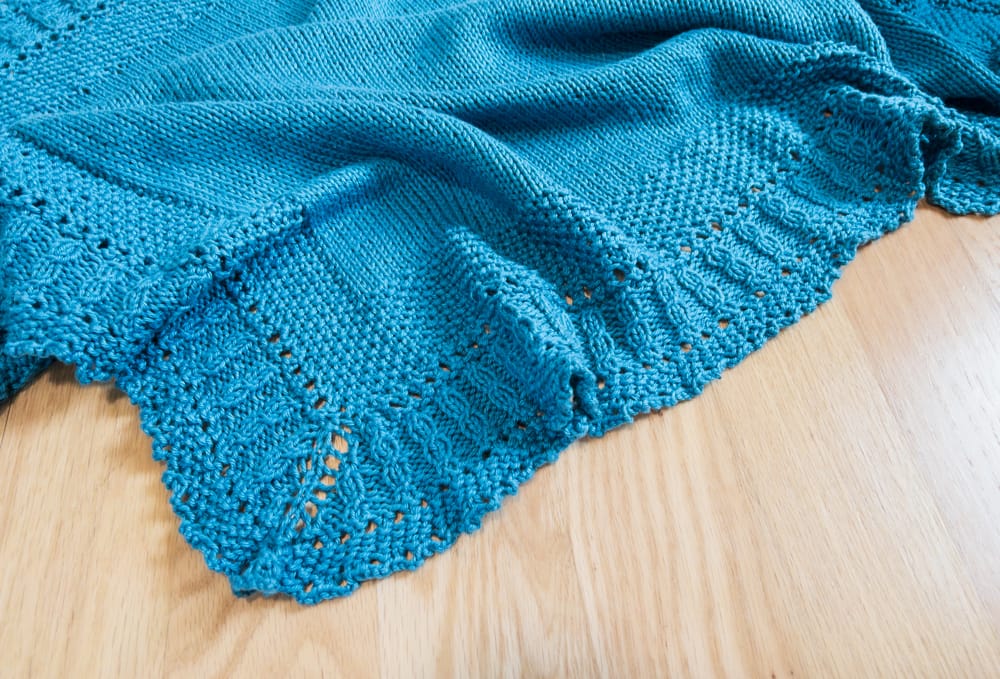
I just wrapped up knitting my second Sleeping Beauty Baby Blanket by Diana Matthews, and let me tell you, I forgot how complicated this pattern is! But it’s totally worth it. Observe the beauty:
First, a shout-out to Knit Picks Comfy Worsted, my favorite yarn for baby blankets. It’s a cotton/acrylic blend that is super soft and easy to care for – which is a MUST for baby blankets – and I just love the drape of it. (Yes, “drape” is totally a thing when evaluating yarn! A “drapey” yarn is all loose and flowy when it’s knitted up – perfect for a blanket!)

Comfy comes in 34 colors, including a lot of lovely pastels, but I’m a huge fan of jewel-tone colors for baby blankets. (Gotta give baby something bright and cheery to look at!) This blue colorway is called Marlin – it’s sort of a medium-turquoise blue that looks vivid in natural light but a little muted in other lighting scenarios.
But I digress… for those of you eyeing this pattern, let’s talk shop. The Sleeping Beauty Baby Blanket might look as innocent as the princess it’s named after, but don’t be fooled. I’d definitely classify this as an intermediate to advanced knitting pattern.
The blanket starts with a provisional cast-on, so you have to know how to do that. I used an Italian Provisional Cast On, which is my favorite provisional cast on. It’s a little awkward at first, but I love how easy it is to pick up the stitches at the end when you are ready to work with them again.
After the cast on, you’re looking at an ocean of seed and stockinette stitch, which makes for great TV knitting. (Or, lately, I’ve been listening to audiobooks while I knit.)

When you’re done with the body of the blanket, get ready for some pain as you pick up HUNDREDS of stitches for the border… then, navigating the spindle border is a bit of a journey of its own. Here’s a pro tip: place stitch markers on either side of all your corner stitches to remind you where to increase.
The original version of this pattern had complicated corner instructions, but the designer recently updated the pattern and re-released it. Clarity updates are actually pretty rare for free patterns, so shout out to Diana Matthews for being on the ball.
That said, managing the corners is still a job. Like I said, I recommend popping stitch markers on either side of the corner stitch and using those as your guide to remember that’s where you yarn over every other row. Don’t stress to much about what the pattern instructions say your last stitch should be. Just work to the marker, YO, sm, knit the corner stitch, sm, YO, and hop right back to the beginning of the instructions.
The final step in this pattern is a beautiful but time-consuming eyelet bind-off. You could use a crochet hook at this step, but aint nobody got time for that. It’s easy enough to do with just your knitting needles. Here’s a little video demoing the technique:
At the end of the day, the Sleeping Beauty Baby Blanket is wonderful opportunity to challenge yourself a bit, maybe learn some new techniques, and create something truly beautiful. I’m giving this blanket to a dear friend of mine and I know it will be cherished for a long time! That makes it all worth it.
Here is a birds-eye-view of the finished blanket. If anyone thinks of a less-boring way to take this kind of photo, please share! I need some inspiration!

yarn details
Knit Picks Comfy Worsted in Marlin
Worsted Weight
75% Pima Cotton, 25% Acrylic
Machine wash/Tumble dry low
50 g /109 yds ball
project details
pattern: “Sleeping Beauty Baby Blanket” by Diana Matthews (free Ravelry download)
needles: US size 6 (4.0 mm), wood circular needles from my interchangeable set (glad I had the option to add an extra long cable for the border!)
gauge: 17 stitches x 24 rows over 4” in stockinette stitch (blocked)
yarn used: 6.88 skeins = 749.9 yards (344 grams)
finished size: 34” wide, 32” tall (didn’t get that perfect square! oops)
duration: December 9, 2023 – February 10, 2024
Leave a Comment