
Heads up! This post contains affiliate links which means I get may get a commission if you purchase something based on my recommendations here.
I was fascinated watching the colors change in the gorgeous hand-dyed yarn I used in my latest shawl project, and I became a little obsessed with knowing the yarn’s backstory. So, I summoned the high school newspaper editor within and reached out to the dyer, Gina Spadoni of Global Backyard, to get the full scoop on my pretty hand-dyed yarn.

Interview With a Hand Dyer
Q: Can you walk me through the yarn dyeing process?
What goes into creating a yarn like this one (Lilac), and how do you achieve the contrast between the white and darker purple?
A: Hand dyeing yarn is a slow process. I buy my merino from a mill in the UK that gets it from Australia and spins it into skeins. I have found that it is the softest I can get my hands on, as well as the most eco-friendly, so I’ve stuck with them. Once I get my undyed yarn in bulk, I first have to scour it (gently wash and soak it to remove any oils left from processing), and then my dye process can begin.
I create big batches of commercial quality dyes, and how I apply them varies by the colorway and type of yarn. The reason I use this type of dye vs. natural is so that the colors won’t fade over time. I would hate to sell people fiber that loses its vibrancy – the thought of someone creating a sweater, for example, only to have it fade in a few years…well, that scenario just makes me shudder.
For the Lilac color, I use a low-immersion technique, which means I wring most of the water out of the skeins and line them up in a steam pan (I dye four at a time). To create this particular colorway, I actually use five different dye colors and mix them in various quantities. I then add water and citric acid to each, and pour them in order across the skeins.
How the bands of color react to each other always varies, based on humidity, slight variations in dye amounts (I use science lab equipment but I am only human), and water quality. I apply the colors to one side and then carefully flip the skeins and apply (in the same order) to the other side. The colors for Lilac aren’t super saturated so there is often a bit of the white yarn showing here and there, too, in a subtle, organic way. Or at least that is the intent.
The last step is to set the color: I cover the pan and steam the yarn for about an hour to allow the dye to bond with the fiber. Then they cool, get another soapy bath and rinse to remove any excess dye. Next, they hang dry in my studio, which can take 2-4 days depending on humidity levels. The final step is twisting them into pretty hanks or caking them, depending on what my customer wants.
Q: What is your favorite type of colorway to create?
Do you prefer tonals, semi-solids, variegated, or something else?
A: I enjoy trying new color combinations and techniques, so generally anything NEW is my favorite!
In that case, Gina, I have a special request for some speckled creations! Go crazy!
Q: When you dye yarn, do you envision how it will be used?
If so, what kinds of projects did you imagine for this yarn? (I knew right away it would make a beautiful shawl!)
A: I imagined a bouquet of lilac flowers when I created this colorway, which is why I felt it needed to have a variety of shades.
Sometimes, though, I do dye a yarn with a project in mind. For example, I have a more saturated lilac coming out soon that looks just lovely with the Lilac you used for this project, and the two together marry well with my Pretty in Pink. I dyed the new color (Purple Haze) so that I could offer a fade kit for Andrea Mowry’s “Free Your Fade” shawl pattern – something I’ve been wanting to do for a while now.
Things that inspire me include: Art, nature, outfits from fashion runways, even creative food packaging can get me thinking! Inspiration can really come from anywhere.
These days I am thinking a lot about creating more color sets that all play well together.
OMG! I absolutely need one of those Free Your Fade kits! I recently finished a project with Pretty in Pink, which was amazing, and anything named Purple Haze gets a thumbs-up from me. 😂
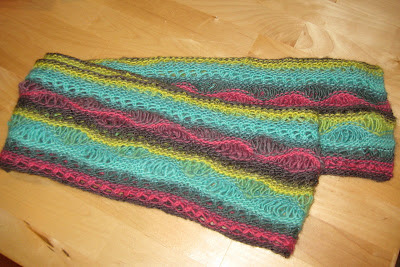
From Skein to Shawl
I can’t believe how much thought and hard work went into making this yarn! Luckily, I gave this little skein a break by picking an easy shawl pattern for the knitting part!

This pattern is called Stormy Sky Shawl, and I love how great it looks with variegated hand-dyed yarn like this one. The best thing about this pattern is that it’s super simple garter stitch most of the way, paired with some eyelets and some segments of a dropped stitch pattern. Those dropped stitch sections are awesome because they add instant length to the shawl, which helps you cruise through the project at warp speed.

Like I said, this shawl is easy to knit, but it will look kind of crappy straight off the needles, so you have to do a good blocking. I definitely recommend using wires and combs when blocking this one. The combination created the perfect amount of tension and helped me get the straight lines I was going for.

Below are my usual project notes. BTW, Gina let me know that she changed up the recipe for Lilac a little bit. The photo of the skein at the top of the post is the newer version, which she says is a bit more variegated than the one in my shawl.
What’s your favorite pattern to knit with hand-dyed yarn? Did you have any idea that the process was so complicated?
yarn details
Lilac Merino Sock Yarn by Global Backyard
Fingering Weight
85% Superwash Extrafine Merino (19.5 micron), 15% Nylon
Handwash Cool and Dry Flat
100 g/437 yd skeins
project details
pattern: “Stormy Sky Shawl” by Ksenia Naidyon (free pattern here)
needles: US size 9 (5.5 mm) circular needles with the longest cable that came in my sunstruck interchangeable circular needle set
yarn used: 423 yards (97 g) knitted straight to the end of the skein!
finished size: 34” by 49” (yes, I realize a side is missing there! IDK, that’s just what I wrote down! lol)
duration: January 8 – May 11, 2024 (was working on several projects at once)
Leave a Comment